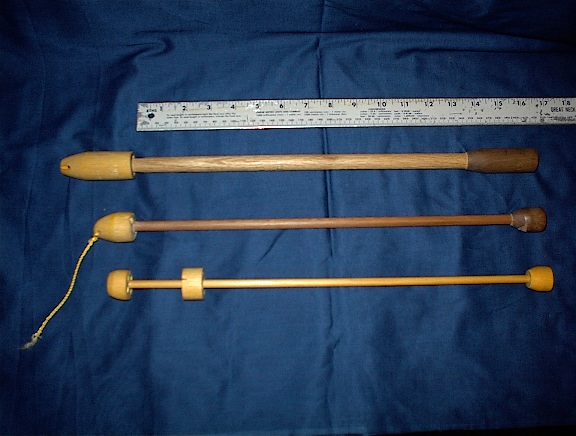
 Here you see all three plungers. These are all effectively
the same length; the length that matters is from the front end of
the plunger to the leading edge of the butt piece, which is about 16"
on all three. The top one was the original but at 95g it was very heavy.
The second was much lighter at 45g. The bottom one (the Mk3) is the lightest
and has several innovations that improve performance:
Here you see all three plungers. These are all effectively
the same length; the length that matters is from the front end of
the plunger to the leading edge of the butt piece, which is about 16"
on all three. The top one was the original but at 95g it was very heavy.
The second was much lighter at 45g. The bottom one (the Mk3) is the lightest
and has several innovations that improve performance:- The plunger is only 25g, being made with pine ends and a fir arrow shaft. I was worried about the strength of the design but it has proven to be more than strong enough.
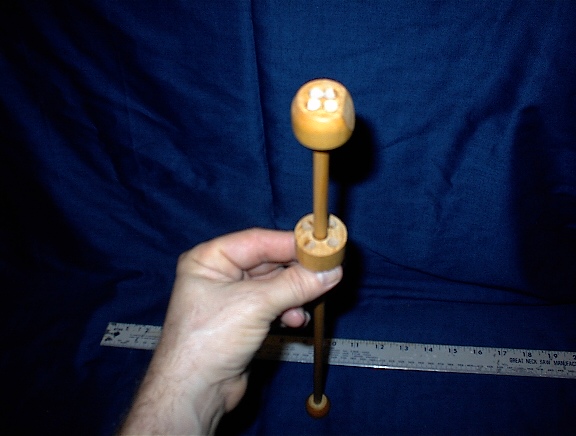
- The end of the plunger that pushes the ball is cupped, which causes the ball to center when it is being pushed down the barrel. This results in minimum friction and maximum energy transfer.
- It is drilled to accept 2 bands of surgical tubing rather than just one as on previous models. Obviously this doubles the energy.
- I have added a ring that is drilled to slide freely on the shaft of the plunger. This "donut of death" is drilled to hold the 4 ends of the surgical tubing. On earlier models it was necessary to have the surgical tubing poke out of holes in sides of the barrel so I had somewhere to secure the ends of the tubing. The donut allows all that to be contained inside the barrel. It also means that the tubing will pull strait forward rather than at an angle, thus increasing the energy pulling the plunger forward.
 Notice the angle on one side of the butt end of the plunger.
This angle pushed the firing pin down to allow the butt of the plunger
to slide past when cocking the gun. This single angled face leaves
me room to drill 4 holes in the butt -- necessary to fit in the 2 sections
of surgical tubing -- but it also makes it critical that the plunger
be aligned exactly right in the barrel. I spent about 45 minutes getting
that just right the first time.
Notice the angle on one side of the butt end of the plunger.
This angle pushed the firing pin down to allow the butt of the plunger
to slide past when cocking the gun. This single angled face leaves
me room to drill 4 holes in the butt -- necessary to fit in the 2 sections
of surgical tubing -- but it also makes it critical that the plunger
be aligned exactly right in the barrel. I spent about 45 minutes getting
that just right the first time.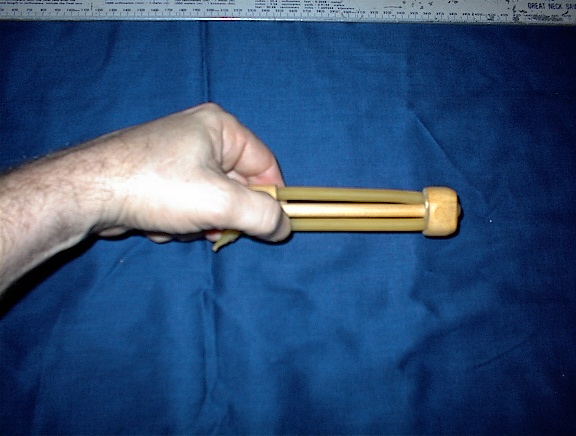 Here is the Mk3 rigged with the first piece of surgical
tubing. I used 10.5 inches of 3/8" surgical tubing for each band.
I just guessed at the length but it came out about right. When it
is right the tubing should be about at maximum stretch (as far as
it can stretch without damage) with the donut is pulled all the way
forward.
Here is the Mk3 rigged with the first piece of surgical
tubing. I used 10.5 inches of 3/8" surgical tubing for each band.
I just guessed at the length but it came out about right. When it
is right the tubing should be about at maximum stretch (as far as
it can stretch without damage) with the donut is pulled all the way
forward. The Mk3 with both pieces of tubing rigged and tied into
the donut of death. A restraining cord is tied through the tubing
at the rear of the plunger. Make sure all 4 strands of tubing are balanced
or the plunger will pull off to one side.
The Mk3 with both pieces of tubing rigged and tied into
the donut of death. A restraining cord is tied through the tubing
at the rear of the plunger. Make sure all 4 strands of tubing are balanced
or the plunger will pull off to one side.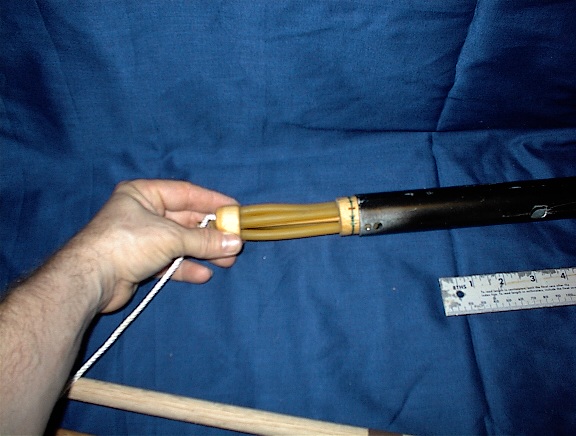 To mount the Mk3 it is best to figure out where in the barrel
the donut will sit and drill 4 equally spaced holes in the barrel
around the circumference of that spot. Then push the plunger into
the barrel, make sure the butt end of the plunger is lined up as you
wish and then mark the donut through each of the holes in the barrel.
Pull out the plunger and carefully drill pilot holes for screws in the
side of the donut. Make sure these holes are in the center between where
the hole were drilled for the tubing because it will screw it up if
the drill through the tubing. The pilot holes are important because if
you just cram screws into the wood it will probably crack.
To mount the Mk3 it is best to figure out where in the barrel
the donut will sit and drill 4 equally spaced holes in the barrel
around the circumference of that spot. Then push the plunger into
the barrel, make sure the butt end of the plunger is lined up as you
wish and then mark the donut through each of the holes in the barrel.
Pull out the plunger and carefully drill pilot holes for screws in the
side of the donut. Make sure these holes are in the center between where
the hole were drilled for the tubing because it will screw it up if
the drill through the tubing. The pilot holes are important because if
you just cram screws into the wood it will probably crack. 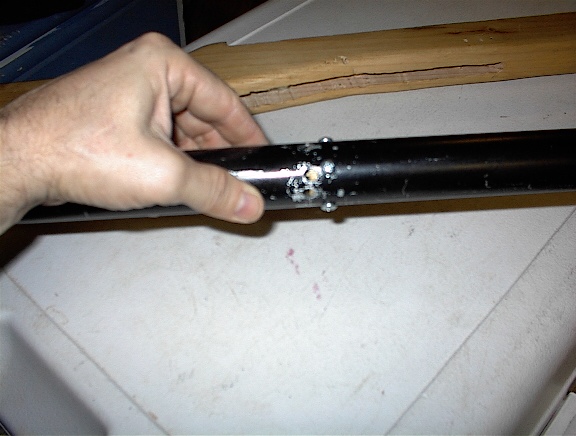 As you can see, I drilled several holes before I got it
right. Whenever I drilled into the barrel I used a long mandrel with
sandpaper to clean it up. There must be NO rough edges inside the barrel
-- it must be sanded smooth. I used 3/8" screws to hold the donut of
death in place. Anything longer than that would go too far into the
wood.
As you can see, I drilled several holes before I got it
right. Whenever I drilled into the barrel I used a long mandrel with
sandpaper to clean it up. There must be NO rough edges inside the barrel
-- it must be sanded smooth. I used 3/8" screws to hold the donut of
death in place. Anything longer than that would go too far into the
wood.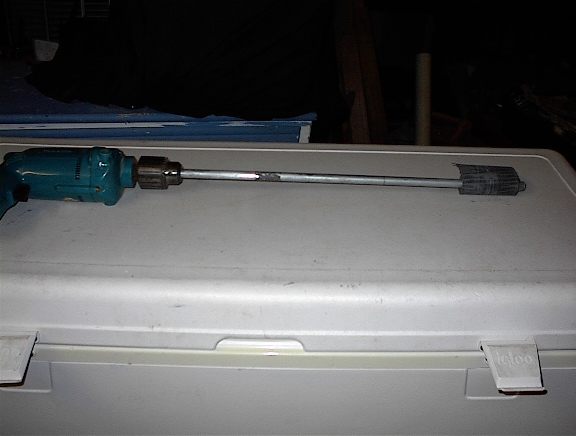 This is my mandrel made from a long piece of 1/2" metal
rod. I wrapped duct tape around that until I got close to the size of
the barrel. Then I taped sand paper on it and mounted the whole thing
on a heavy duty electric drill. I used a vice to hold the barrel in place
while I sanded it out (be careful not to crush or reshape the barrel with
the vice). I used rough emery paper and graduated to fine metal sanding
paper. I carefully cleaned out all the metal flakes and dust with damp
and dry paper towels put on a long section of wooden dowel like a huge q-tip.
Do not put oil in the barrel as it will mess up the rubber
ball and the wood. The final lubricant should be talc. Don't use cornstarch
(used in most baby powder) as it gets gummy over time.
This is my mandrel made from a long piece of 1/2" metal
rod. I wrapped duct tape around that until I got close to the size of
the barrel. Then I taped sand paper on it and mounted the whole thing
on a heavy duty electric drill. I used a vice to hold the barrel in place
while I sanded it out (be careful not to crush or reshape the barrel with
the vice). I used rough emery paper and graduated to fine metal sanding
paper. I carefully cleaned out all the metal flakes and dust with damp
and dry paper towels put on a long section of wooden dowel like a huge q-tip.
Do not put oil in the barrel as it will mess up the rubber
ball and the wood. The final lubricant should be talc. Don't use cornstarch
(used in most baby powder) as it gets gummy over time. 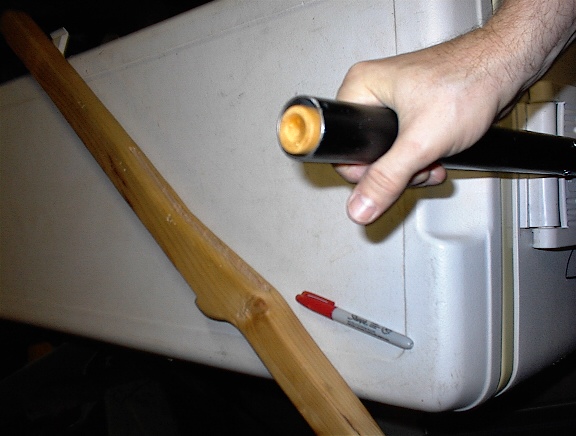 Notice the cupped end on the plunger. Besides centering
the ball it also centers the ram rod when cocking the gun.
Notice the cupped end on the plunger. Besides centering
the ball it also centers the ram rod when cocking the gun. 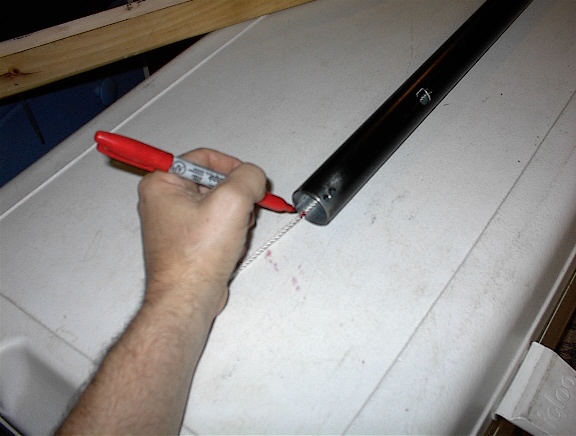 Here I am measuring the length of the maximum pull on the
restraining cord. This cord is designed to keep the plunger from
poking out past the end of the barrel.
Here I am measuring the length of the maximum pull on the
restraining cord. This cord is designed to keep the plunger from
poking out past the end of the barrel. 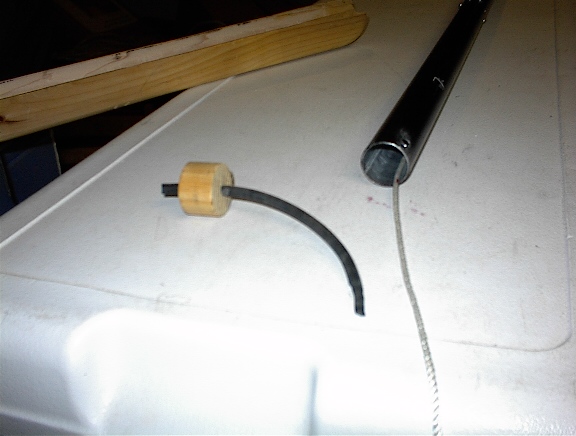 In this case I decided to add a surgical tubing "shock absorber"
to the cord. I drilled out another donut, slightly larger than the
barrel. I put a piece of tubing through the hole and secured it on
the backside with a knot that would not fit through the hole.
In this case I decided to add a surgical tubing "shock absorber"
to the cord. I drilled out another donut, slightly larger than the
barrel. I put a piece of tubing through the hole and secured it on
the backside with a knot that would not fit through the hole.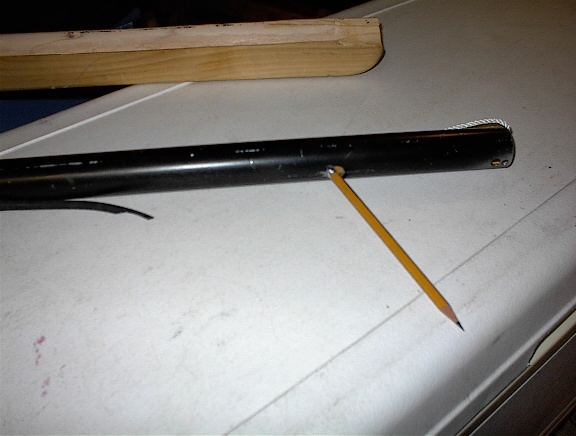 I used a pencil in the trigger hole to hold the plunger back while I set
up the restraining cord.
I used a pencil in the trigger hole to hold the plunger back while I set
up the restraining cord.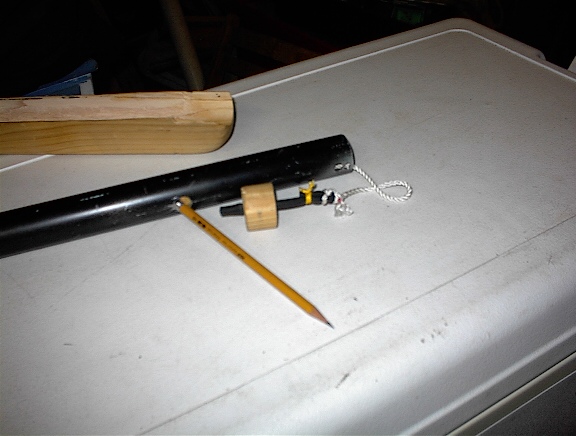 Here is the cord, shock absorber and restraining donut all
ready to go. I had to figure out how long to make the string through
trial and error (lots of error).
Here is the cord, shock absorber and restraining donut all
ready to go. I had to figure out how long to make the string through
trial and error (lots of error). 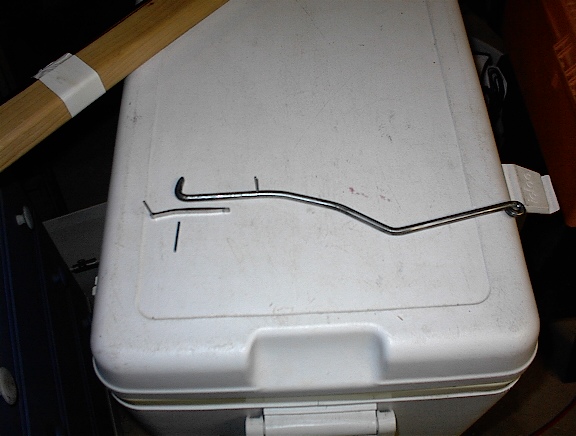 The metal parts of the trigger assembly. This is a very
simple trigger. It consists of a spring, a lever and 3 pins. 2 pins
hold and tension the spring. The last pin provides a pivot for the lever.
The only tricky part of this is the tip of the lever, i.e. the firing
pin. Notice that I have ground the front of the pin back at an angle but
the back is flat. This allows the plunger to push the pin down as it goes
past on the cocking stroke. The flat back surface then holds the plunger
in place until the gun is fired. Bending the pin slightly backwards as
I have helps both with cocking and holding the plunger with fewer misfires.
Be sure to sand and polish the front angled surface of the pin smooth and
slick of there will be too much friction to cock the gun.
The metal parts of the trigger assembly. This is a very
simple trigger. It consists of a spring, a lever and 3 pins. 2 pins
hold and tension the spring. The last pin provides a pivot for the lever.
The only tricky part of this is the tip of the lever, i.e. the firing
pin. Notice that I have ground the front of the pin back at an angle but
the back is flat. This allows the plunger to push the pin down as it goes
past on the cocking stroke. The flat back surface then holds the plunger
in place until the gun is fired. Bending the pin slightly backwards as
I have helps both with cocking and holding the plunger with fewer misfires.
Be sure to sand and polish the front angled surface of the pin smooth and
slick of there will be too much friction to cock the gun. 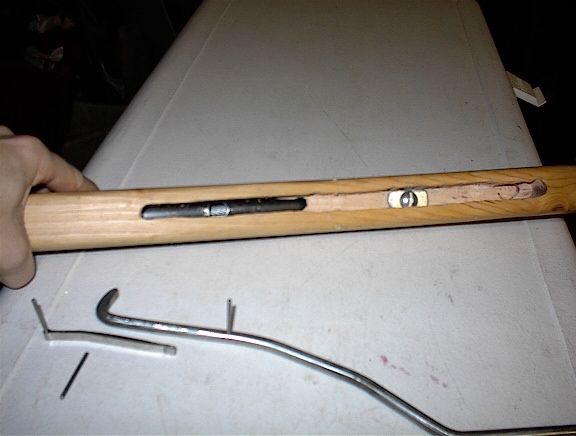 The barrel with the trigger hole. Originally I just drilled
the trigger hole but it was not long enough and not quite in the right
place so I attacked it with a file to enlarge it longways.
The barrel with the trigger hole. Originally I just drilled
the trigger hole but it was not long enough and not quite in the right
place so I attacked it with a file to enlarge it longways. 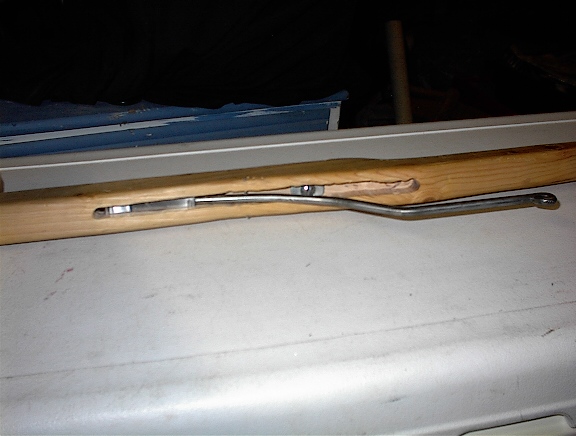 The Trigger assembly in place. The pins are made from sections
of finishing nails, rounded and smoothed on the tips. The lever is
5/16" mild steel rod stock (square stock might work better). The spring
is a piece of stainless steel cut from a big screw clamp and bent double.
These were just things I had around the shop and I am sure lots of
other things could be used.
The Trigger assembly in place. The pins are made from sections
of finishing nails, rounded and smoothed on the tips. The lever is
5/16" mild steel rod stock (square stock might work better). The spring
is a piece of stainless steel cut from a big screw clamp and bent double.
These were just things I had around the shop and I am sure lots of
other things could be used. 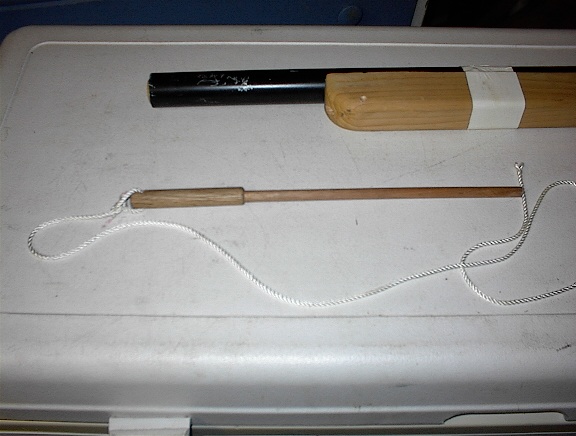 The ram rod. The bigger piece is just a grip -- only the
thinner shaft goes into the barrel. Yes, the plunger only travels
that far. No, the barrel cannot be cut down. There are only a couple
of extra inches of barrel. Once you figure the length of the throw, the
length of the plunger and where the plunger goes when it is cocked, it
all makes sense. A pistol using this system would have a VERY short throw
and might not be able to throw the ball a reasonable distance.
The ram rod. The bigger piece is just a grip -- only the
thinner shaft goes into the barrel. Yes, the plunger only travels
that far. No, the barrel cannot be cut down. There are only a couple
of extra inches of barrel. Once you figure the length of the throw, the
length of the plunger and where the plunger goes when it is cocked, it
all makes sense. A pistol using this system would have a VERY short throw
and might not be able to throw the ball a reasonable distance. 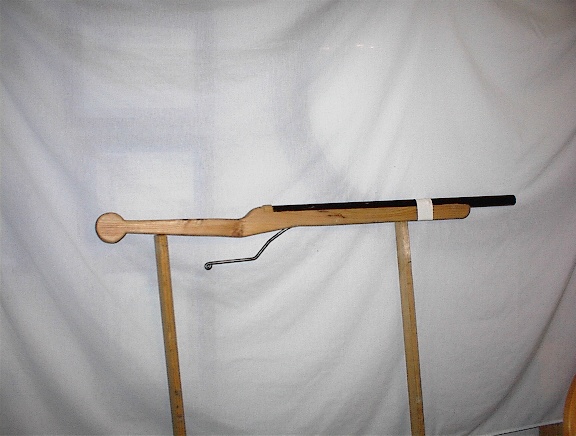 The ugly prototype, complete. Don't stress about the stock
as you can change that out for any style that suits you. The only
limit is your wood working skills.
The ugly prototype, complete. Don't stress about the stock
as you can change that out for any style that suits you. The only
limit is your wood working skills.