Basic Shirt
This page gives you the dimensions and an efficient cutting
layout for making a basic shirt. This is not designed as a
detailed guide so I assume the reader is familiar with basic
sewing techniques.
Notes (learn from our mistakes):
- Be sure to finish all your edges, especially if you are
working with linen. You can zig-zag all the edges on your pieces
before sewing them together or you can use French or flat fled
seams. Be sure to finish the bottom of the shirt using a rolled
hem as zig-zagging is not sufficient there.
- This shirt is designed to fit someone who would wear a Large
T-shirt, though it will also fit for many who wear a Medium or
X-Large. Beyond that you will need to make adjustments.
- You may wish to customize the collar and cuffs even if you do
not change any other measurements. For the collar, measure the
base of the throat and 2 inches. For the cuffs, measure the wrist
and add 3 inches.
- The sleeves will have a pleat or some gathers at the top
where it is attached to the body. This will account for about
2" of the circumference of the sleeve piece. This gathered
or pleated cloth goes only at the top of the sleeve and is not
distributed evenly around the entire sleeve.
- Sew the sleeve into the body before sewing the length of the
sleeve shut. Next, sew in the underarm gusset starting at the
corner where the sleeve and body meet. Then you can sew the
sleeve and body shut.
- Be very careful not to sew the sleeves in sideways. Remember
the longest measure (26") goes around the arm.
- Don't sew the last 3 inches of the sides of the shirt
body shut. That provides a shirt tail for tucking into
pants.
- Seams on the neck facing are very small (¼"),
except at the top where the facing goes into the collar where it
is the normal ½".
- Sew the neck facing and the neck gussets to the shirt before
attaching the collar.
- When attaching the collar, be careful of positioning. You
will need to pleat the body into the collar in front and back.
Keep it even; if you push all the extra bulk to the front or to
the back, the shirt will hang oddly and look weird.
- The collar and cuffs are made from single pieces folded in
half. If you make 2-piece collar and cuffs instead, be sure to
add a ½" seam allowance on each piece where
the fold would have been.
- Put buttons on the cuffs and ties on the neck. Ties at the
cuffs are a real pain.
- To put buttons on the cuffs, first make the button holes and
then place the buttons to fit your wrist. Buttons are a lot
easier to move than button holes.
- I prefer pleats to gathers. I think it makes the shirt hang
better and look more crisp.
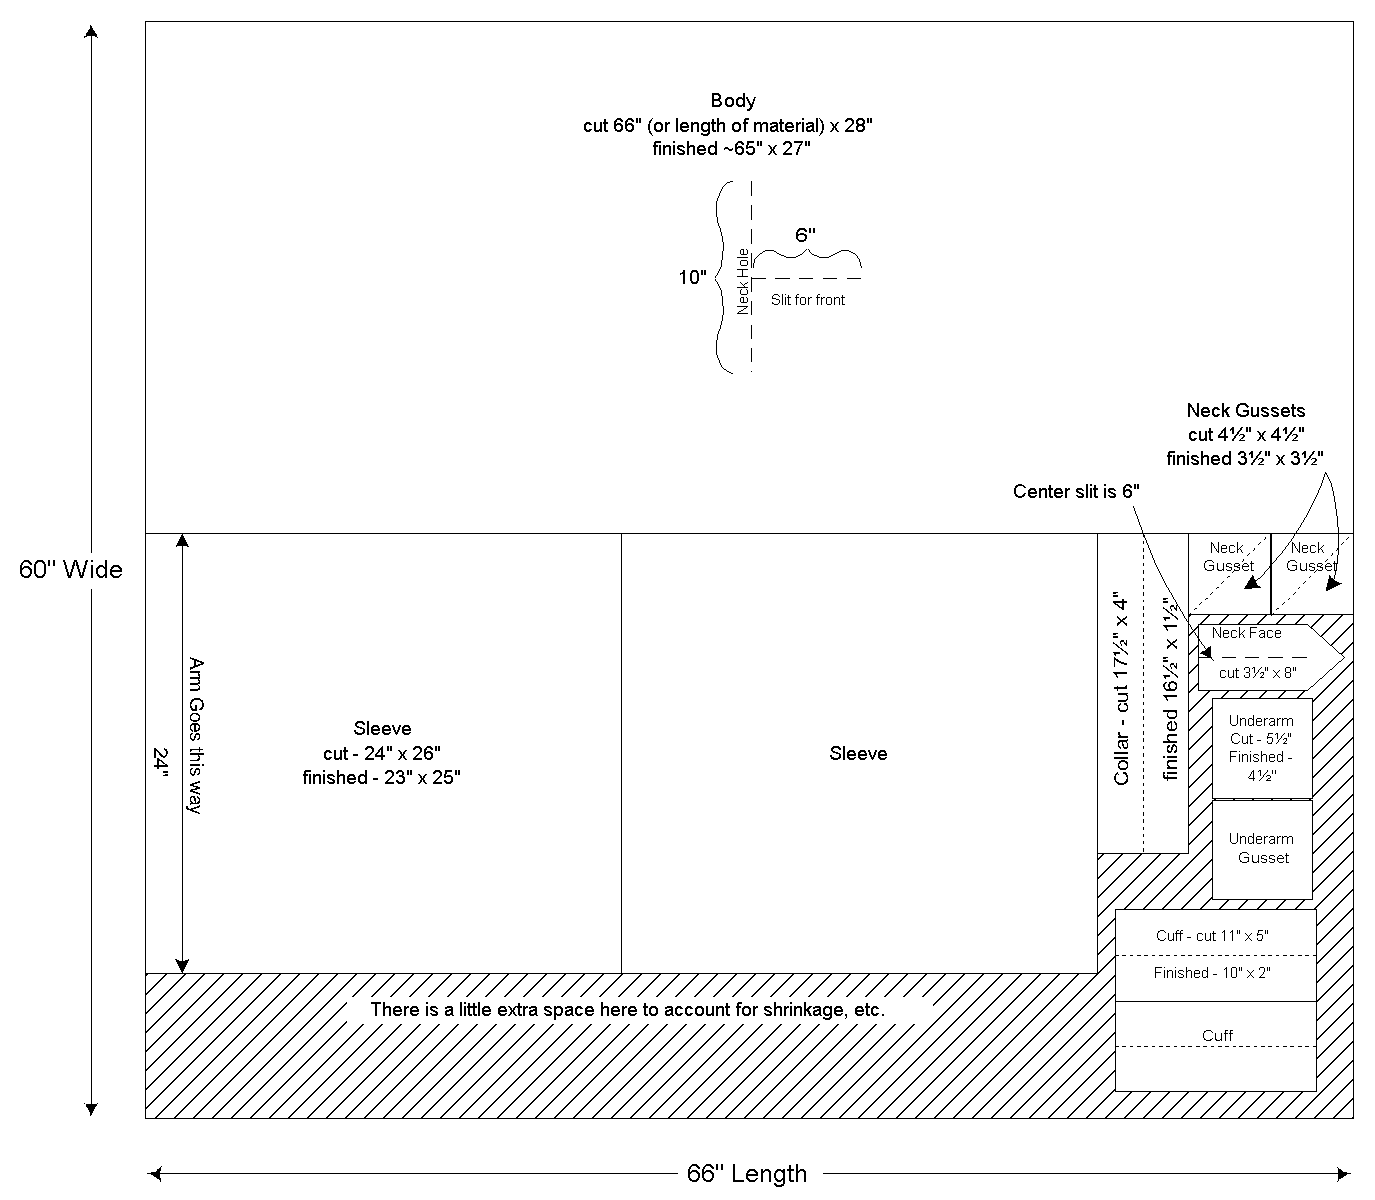
Fabric Layout for Basic Shirt
Using 66" of 60" wide material
½" seam allowances are included